Cast iron downpipe repair at the Old Post Office
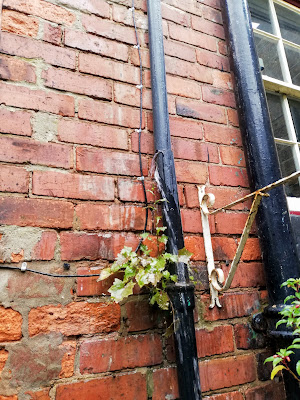
We had a guest (family) visit during the last weekend. I was outside the house while the guest was using the bathroom. I noticed the downpipe from the bathroom was badly leaking with draining bathwater gushing out against the brickwork of the house.
It was obvious that the cast iron pipe had fractured clear through its circumference at about 2.5 metres above the ground and had become slightly displaced allowing water to gush out. Once the water stopped flowing I decided to investigate and got the ladder out to get close to the damage. On closer inspection I was able to ascertain that some mastic coated aluminium tape had come free from the back of the cast iron pipe. This tape had been painted over at least twice in different coloured paint, so the "repairs" were probably at least 15 years old by previous owners of the building. This had now failed.
The pipe is probably of Georgian, or possibly Victorian, vintage. I measured the external pipe diameter with a caliper and checked on-line to see if I could find a supplier of this type of hardware. I was able to find a couple of suppliers who still make these pipes in cast iron and of almost identical appearance for both 2 inch and 3 inch diameter in appropriate 6 foot lengths. The price for a 6 foot section with an "eared" socket is about £110. The problem was that the diameter I'd measured was about 2.25 inches. This could have led to difficulties in fitting the replacement. So I decided to attempt a repair. For the interim I just applied some heavy duty external tape to temporarily rejoin the pipe. This worked reasonably well with just a slight leak.
After some investigation I decided to effect the repair with Plumber's Epoxy Putty. I chose the range that was steel filled (for ironwork) and also had an initial setting time of 5 minutes. It is called Sylmasta Superfast Steel Epoxy stick and can be located here. Once the putty arrived and the rainy weather had paused I decided to get on with a more permanent repair.
I erected some staging so I could safely work on the pipe. Cast iron pipe is heavy. A 6 foot section could easily weigh 15-20 Kg (30 - 45 lbs) and trying to work one handed with the pipe whilst on a ladder is not sensible. I took measures to secure the remaining pipework whilst I removed the 60 cm (2 ft) damaged section. It took a little wriggling to remove the damaged section, but it was soon on the ground where I could get a closer look. I quickly realised the whole length on the back of the pipe had been previously fixed with aluminium and mastic tape, probably roof leak repair tape. I removed the tape with a screwdriver and found a crack in the cast iron pipe section. The crack ran the entire length and in some places the cast iron was fragmented, and some of those fragments were missing. The pipe was in bad shape!
I decided to get on with the repair, and where necessary rebuild the missing sections with the epoxy putty. Once hardened it is very strong and not as brittle as the original cast iron. However, to get good adhesion from the epoxy I had to clean the area back to bare metal removing rust, dirt and paint. This was achieved using an emery flap wheel on my angle grinder. The crack itself was quite rusted and by the time I'd finished the cleaning process it was significantly wider with several small fragments of pipe missing.


Comments
Post a Comment
We automatically delete any SPAM comments. All comments are subject to moderation before publishing. Any SPAM is individually reported to Google as such, this reduces the offending site's Google Ranking.